
Build
MCP server
Let AI agents such as Claude use your data over MCP: publish collections, aggregations, streams and GraphQL apps, and the agent works within your permissions.
Every service can present itself to an AI agent over the Model Context Protocol. You choose which collections, aggregations, change streams and GraphQL applications the agent may use, and describe each one so it knows what the thing is for. Nothing is exposed until you publish it.
|
Note
|
MCP is in beta. The endpoint and the published catalogue are stable enough to build against; expect the page itself to keep gaining features. |
Your first agent, in ten minutes
Three steps, from a service to Claude answering a question about your data. Nothing here needs code.
-
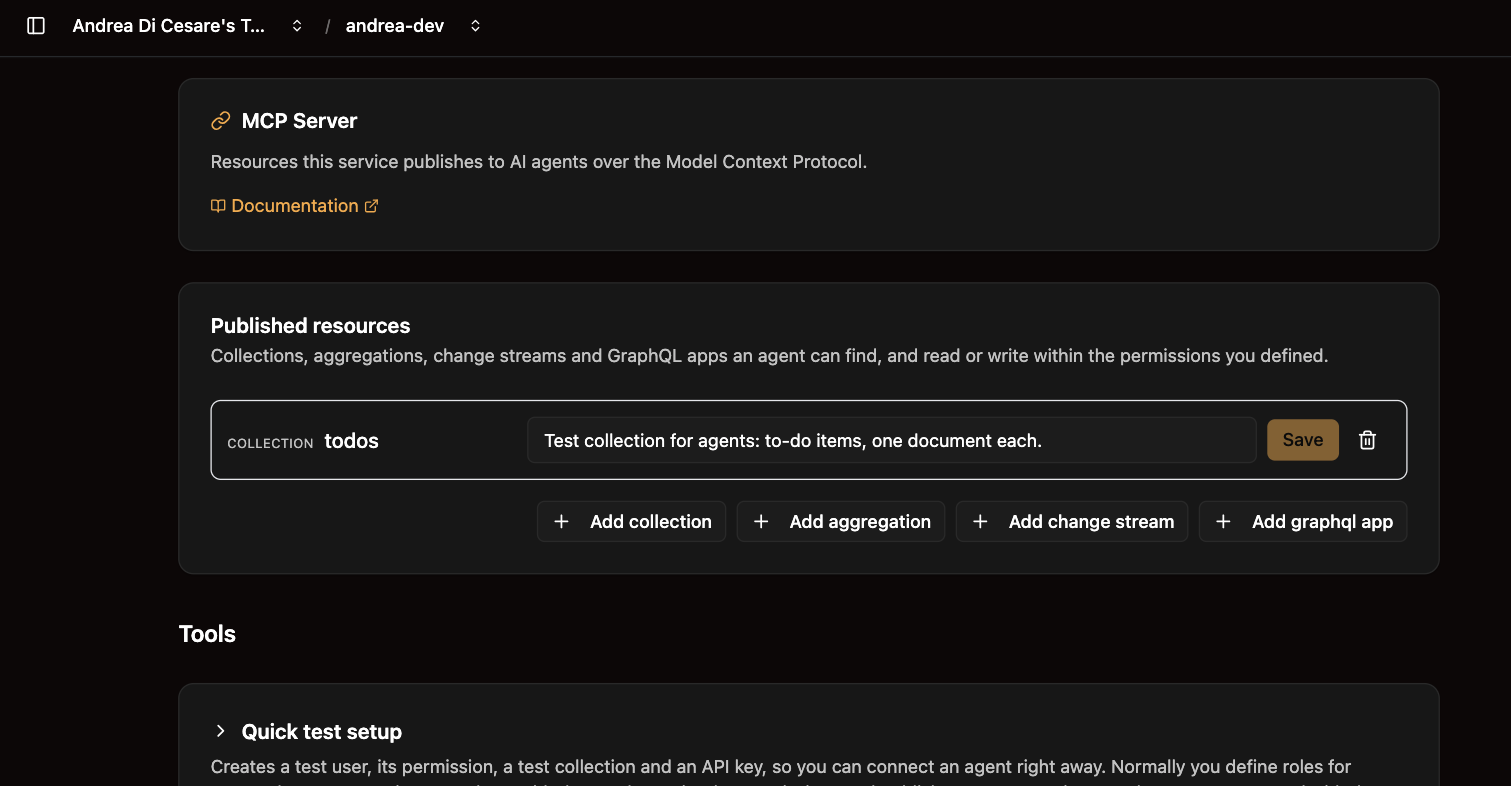
Publish a collection. Under Published resources, Add collection, pick one, and write what it holds — a sentence an agent reads to decide whether this is the data it wants. Say
orders: "Customer orders, one document per order, with status and total." Or skip this: the next step publishes a test collection. -
Quick test setup. Under Tools → Quick test setup, click Do all. It creates the user
agent, a permission for it on/mcpand on the test collection/todos, publishes/todoswith a JSON schema, and issues an API key, shown once. To letagentreadorderstoo, add a permission for the roleagenton/orderson the Permissions page. Test credentials is now filled in with the key: load it, and the collections are there. -
Connect Claude. In Claude, Settings → Connectors → Add custom connector, paste the endpoint from How to connect an agent, and when Claude asks you to sign in, sign in as
agentwith the password shown in Quick test setup. In Cursor, VS Code or Claude Code, use the snippet under How to connect an agent instead: the key is already in it. Then ask: "How many orders are still open?"
The agent reads the catalogue, finds orders, reads it with the permissions of agent, and answers. Everything it can do from here is what that user, with that role, can do over REST.
Published resources
The page opens with the Published resources panel: the collections, aggregations, change streams and GraphQL apps an agent can find, and read or write within the permissions you defined. It starts empty.
To publish something, click the Add button for its type at the bottom of the panel — Add collection, Add aggregation, Add change stream, Add GraphQL app — and a form opens in its place:
-
Which one — pick from what is not published yet, of that type.
-
What it is for — the description the agent reads to decide whether this is the resource it wants.
-
Publish.
The description is the part that matters. An agent picks a resource by reading it, so write what the thing holds or computes, not what it is called:
| Type | What to write |
|---|---|
Collection |
What it holds, so an agent knows when to read it. |
Aggregation |
What it computes, and what its parameters mean. |
Change stream |
What changes it reports. |
GraphQL app |
What this API is for. |
To unpublish, remove the entry. The agent stops seeing it on its next catalogue read.
Publishing and permissions are two separate switches. A published resource the agent’s role cannot read is not in its catalogue; a readable resource that is not published is not there either.
Parameters of a parametric aggregation
An aggregation whose pipeline uses $var takes parameters, and the page lists them under the entry, one row each, driven by the pipeline itself: add a variable to the stages and the row appears.
Give each one a type and a description. Left undescribed, an agent is told the parameter exists and nothing more, which in practice means it guesses.
Tools
Under the panel, four folded panels: click a title to open it.
Quick test setup
Creates a test user, its permission, a test collection and an API key, so you can connect an agent right away. Normally you define roles for agents, let your users issue API keys with those roles, write the permissions and publish resources; this panel makes a test version of each, and shows with a checkbox which ones already exist:
| Item | What it is | Button |
|---|---|---|
Test user |
A user of the service with the role |
Create, or Reset password when the user exists |
Test permission |
The role |
Create, or Rewrite |
Test collection |
Created empty if missing, given the JSON schema |
Publish |
API key for |
Turns API keys on if needed, lets the role |
Issue, or Reissue |
Do all runs the unchecked items in order. Everything it writes is what you would create yourself on the Users, Permissions, Schemas and API Keys pages, under those names, and can be changed there. A permission applies within 20 seconds.
To just try, the root user created with the service works too, and sees everything.
Test credentials
Enter an API key or a user’s password and load the catalogue of MCP resources that credential gets. Credentials carry a role, and the role’s permissions decide which resources the agent can see and write: the same service shows different things to different users, because permissions apply to MCP exactly as they apply to REST.
Test with the credential the agent will actually use. A password test shows what the user sees; a key carries only the roles it was issued with, so its agent may see less.
Two things the listing does not show on its own:
-
The listing is only the first half. What an agent then reads is narrowed again by the permission’s
readFilterandprojectResponse, which apply to MCP reads as they do to REST ones. -
A GraphQL app’s schema is already per-caller here: a field its
@visibledirective hides from those roles is absent from what you see.
How to connect an agent
The panel gives you the endpoint and the four facts every client needs:
| Value | |
|---|---|
Endpoint |
|
Transport |
Streamable HTTP |
Configuration |
MCP 2025-06-18 |
Headers |
|
The panel also has ready-made steps for the three common clients:
-
Claude — Settings → Connectors, in the desktop app or on claude.ai. Add → Add custom connector, and paste the endpoint. Claude then opens your service’s login page: sign in as a user of the service, with that user’s own username and password. Not your RESTHeart Cloud account, which signs you into the console and is unknown to the service. The agent reads what that user may read.
-
Cursor — add it from Cursor’s own settings and paste the endpoint. In the
Authorizationheader putBearerand an API key (rhak_…) a user of the service issued for the agent. The panel shows the.cursor/mcp.jsonit expects, with the key from Quick test setup already in it. -
VS Code — run "MCP: Add Server" from the Command Palette and paste the endpoint, with the same
Authorizationheader. The panel shows the.vscode/mcp.json.
For anything else — Zed, Windsurf, Claude Code, an agent you wrote yourself — the four facts above are all the configuration there is.
Give the agent its own credential
An agent reads with the permissions of whoever it authenticates as. Before one can connect, two things have to be in place:
-
An API key. A user of your service issues one for the agent, and the key carries a role you chose for that user on the API Keys page: see API Keys for Agents for how to turn that on and how a key is issued. Not your own account, and not the service administrator: an agent that authenticates as an administrator can read everything the administrator can.
-
Permissions for that role, written on the Permissions page like any other. One to reach the endpoint, with predicate
path-prefix('/mcp'), and one for each collection or resource the agent may read, exactly as for a RESTGETon it: the samereadFilterandprojectResponseapply. A resource the role cannot read is not in its catalogue, published or not.
A client that signs the user in through the browser, like Claude, needs no key: the user signs in as themselves and their roles apply. The second point still holds for those roles.
The OAuth login page
Clients like Claude use OAuth authentication: when a user adds your service as a connector, Claude opens a login page where they enter their credentials for your service. Clients that use an API key, like Cursor and VS Code, never see it.
The default page is https://f3a9c1.eu-central-1-free-1.restheart.com/oauth/login" class="bare">https://f3a9c1.eu-central-1-free-1.restheart.com/oauth/login. Under OAuth Login Page you can set a custom one, so the user sees your application’s login: it receives the OAuth parameters as a query string and must POST them, plus the user’s credentials, to https://f3a9c1.eu-central-1-free-1.restheart.com/authorize" class="bare">https://f3a9c1.eu-central-1-free-1.restheart.com/authorize. The URL must be absolute, https:// or http://.
The same panel lists the allowed redirect URIs: the redirect_uri values /authorize accepts, * as a wildcard. It starts as the default list, which is what Claude and the desktop clients need. If you customise it, keep the claude.ai entry, or Claude can no longer connect: your list replaces the default rather than extending it.
Related pages
-
The market game — the full tutorial: three AI agents trading through a service’s MCP server, with one collection, six rules and no code
-
API Keys for Agents — the credential an agent uses, and how a user issues one
-
Managing Permissions (ACL) — what an agent may read, including
readFilterandprojectResponse -
JSON Schemas — what the test collection’s schema is made of
-
Aggregation Pipelines — where
$varparameters come from -
GraphQL Applications — and the
@visibledirective